![Thợ Sửa Máy Giặt [ Tìm Thợ Sửa Máy Giặt Ở Đây ]](https://thomaygiat.com/wp-content/uploads/sua-may-giat-lg-tai-nha-1.jpg)
Add Android App Links | Android Studio | Android Developers
To add tư vấn for Android App Links :
- Create intent filters in your manifest.
- Add code to your app’s activities to handle incoming links.
- Associate your app and your website with Digital Asset Links.
The App Links Assistant in Android Studio simplifies the process with a step-by-step wizard, as described below .
For more information about how app links work and the benefits they offer, read
Handling Android App Links.Add intent filters
The App Links Assistant in Android Studio can help you create intent filters in your manifest and map existing URLs from your website to activities in your app. The App Links Assistant also adds template Java code in each corresponding activity to handle the intent .
To add intent filters and URL handling, follow these steps :
- Select Tools > App Links Assistant.
- Click Open URL Mapping Editor and then click Add
at the
bottom of the URL Mapping list to add a new URL mapping.- Add details for the new URL mapping :
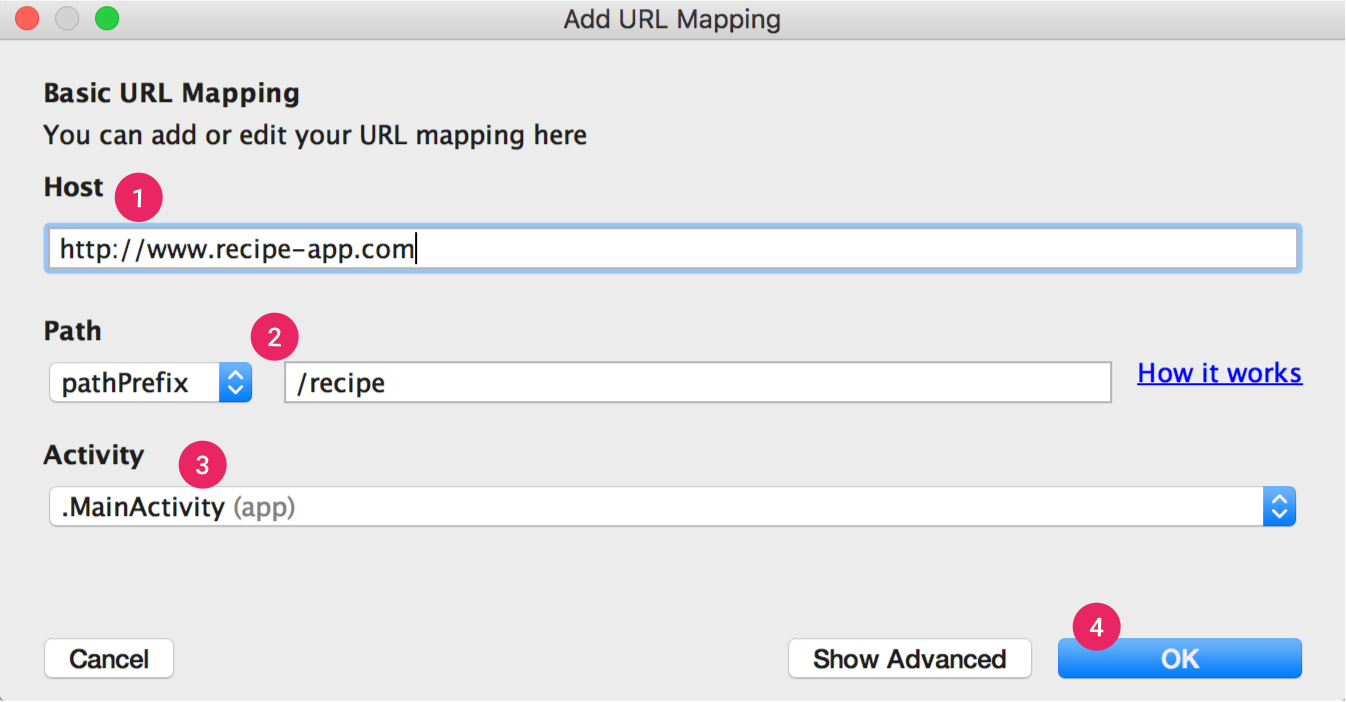
Figure 1. Add basic details about your site’s link
structure to map URLs to activities in your app.
- Enter your website’s URL in the Host field.
Add a
path,
pathPrefix, orpathPatternfor the URLs you want to map.For example, if you have a recipe-sharing app with all the recipes available in the same
activity, and your corresponding website’s recipes are all in the same /recipe
directory, use pathPrefix and enter /recipe. This way, the URL
http://www.recipe-app.com/recipe/grilled-potato-salad maps to the activity you select in
the following step.- Select the Activity the URLs should take users to.
- Click OK.
The URL Mapping Editor window appears. The App Links Assistant adds intent filters based on your
URL mapping to the
AndroidManifest.xmlfile and highlights the changes in the
Preview field. If you’d like to make any changes, click Open
AndroidManifest.xml to edit the intent filter. To learn more, see intent
filters for incoming links.Note: To support future links without updating your app,
define a URL mapping that supports URLs that you plan to add. Also, include
a URL for your app home screen so it’s included in search results.To verify that your URL mapping works properly, enter a URL in the Check URL Mapping
field and click Check Mapping.If it’s working correctly, the success message shows that the URL you entered map to the activity you selected.
Handle incoming links
Once you’ve verified that your URL mapping is working correctly, add logic to handle the intent you created :
- Click Select Activity from the App Links Assistant.
- Select an activity from the list and click Insert Code.
The App Links Assistant adds code to your activity’s Java file, similar to the following :
Note: The App Links Assistant doesn’t support Kotlin, so
you need to add Kotlin code manually.Kotlin
override fun onCreate(savedInstanceState: Bundle?) {
    super.onCreate(savedInstanceState)
    ...
    val appLinkIntent = intent
    val appLinkAction = appLinkIntent.action
    val appLinkData = appLinkIntent.data
    ...
}
Java
@Overrride
void onCreate(Bundle savedInstanceState) {
    super.onCreate(savedInstanceState);
    ...
    // ATTENTION: This was auto-generated to handle app links.
    Intent appLinkIntent = getIntent();
    String appLinkAction = appLinkIntent.getAction();
    Uri appLinkData = appLinkIntent.getData();
    ...
}
This code isn’t complete on its own. You must now take an action based on the URI in
appLinkData, such as displaying the corresponding content. For example, for the
recipe-sharing app, your code might look like the following sample:Kotlin
override fun onCreate(savedInstanceState: Bundle?) {
    super.onCreate(savedInstanceState)
    ...
    handleIntent(intent)
}

override fun onNewIntent(intent: Intent) {
    super.onNewIntent(intent)
    handleIntent(intent)
}

private fun handleIntent(intent: Intent) {
    val appLinkAction = intent.action
    val appLinkData: Uri? = intent.data
    if (Intent.ACTION_VIEW == appLinkAction) {
        appLinkData?.lastPathSegment?.also { recipeId ->
            Uri.parse("content://com.recipe_app/recipe/")
                    .buildUpon()
                    .appendPath(recipeId)
                    .build().also { appData ->
                        showRecipe(appData)
                    }
        }
    }
}
Java
protected void onCreate(Bundle savedInstanceState) {
  super.onCreate(savedInstanceState);
  ...
  handleIntent(getIntent());
}

protected void onNewIntent(Intent intent) {
  super.onNewIntent(intent);
  handleIntent(intent);
}

private void handleIntent(Intent intent) {
    String appLinkAction = intent.getAction();
    Uri appLinkData = intent.getData();
    if (Intent.ACTION_VIEW.equals(appLinkAction) && appLinkData != null){
        String recipeId = appLinkData.getLastPathSegment();
        Uri appData = Uri.parse("content://com.recipe_app/recipe/").buildUpon()
            .appendPath(recipeId).build();
        showRecipe(appData);
    }
}
Associate your app with your website
After setting up URL tư vấn for your app, the App Links Assistant generates a Digital Assets Links file you can use to associate your website with your app .
As an alternative to using the Digital Asset Links file, you can associate your site and app in Search Console .If you’re using
Play App
Signing for your app, then the certificate fingerprint produced by the App Links
Assistant usually doesn’t match the one on users’ devices. In this case, you can find the
correct Digital Asset Links JSON snippet for your app in your
Play Console developer account under
Release > Setup > App Integrity.To associate your app and your website using the App Links Assistant, click Open
Digital Asset Links File Generator from the App Links Assistant and follow these
steps:
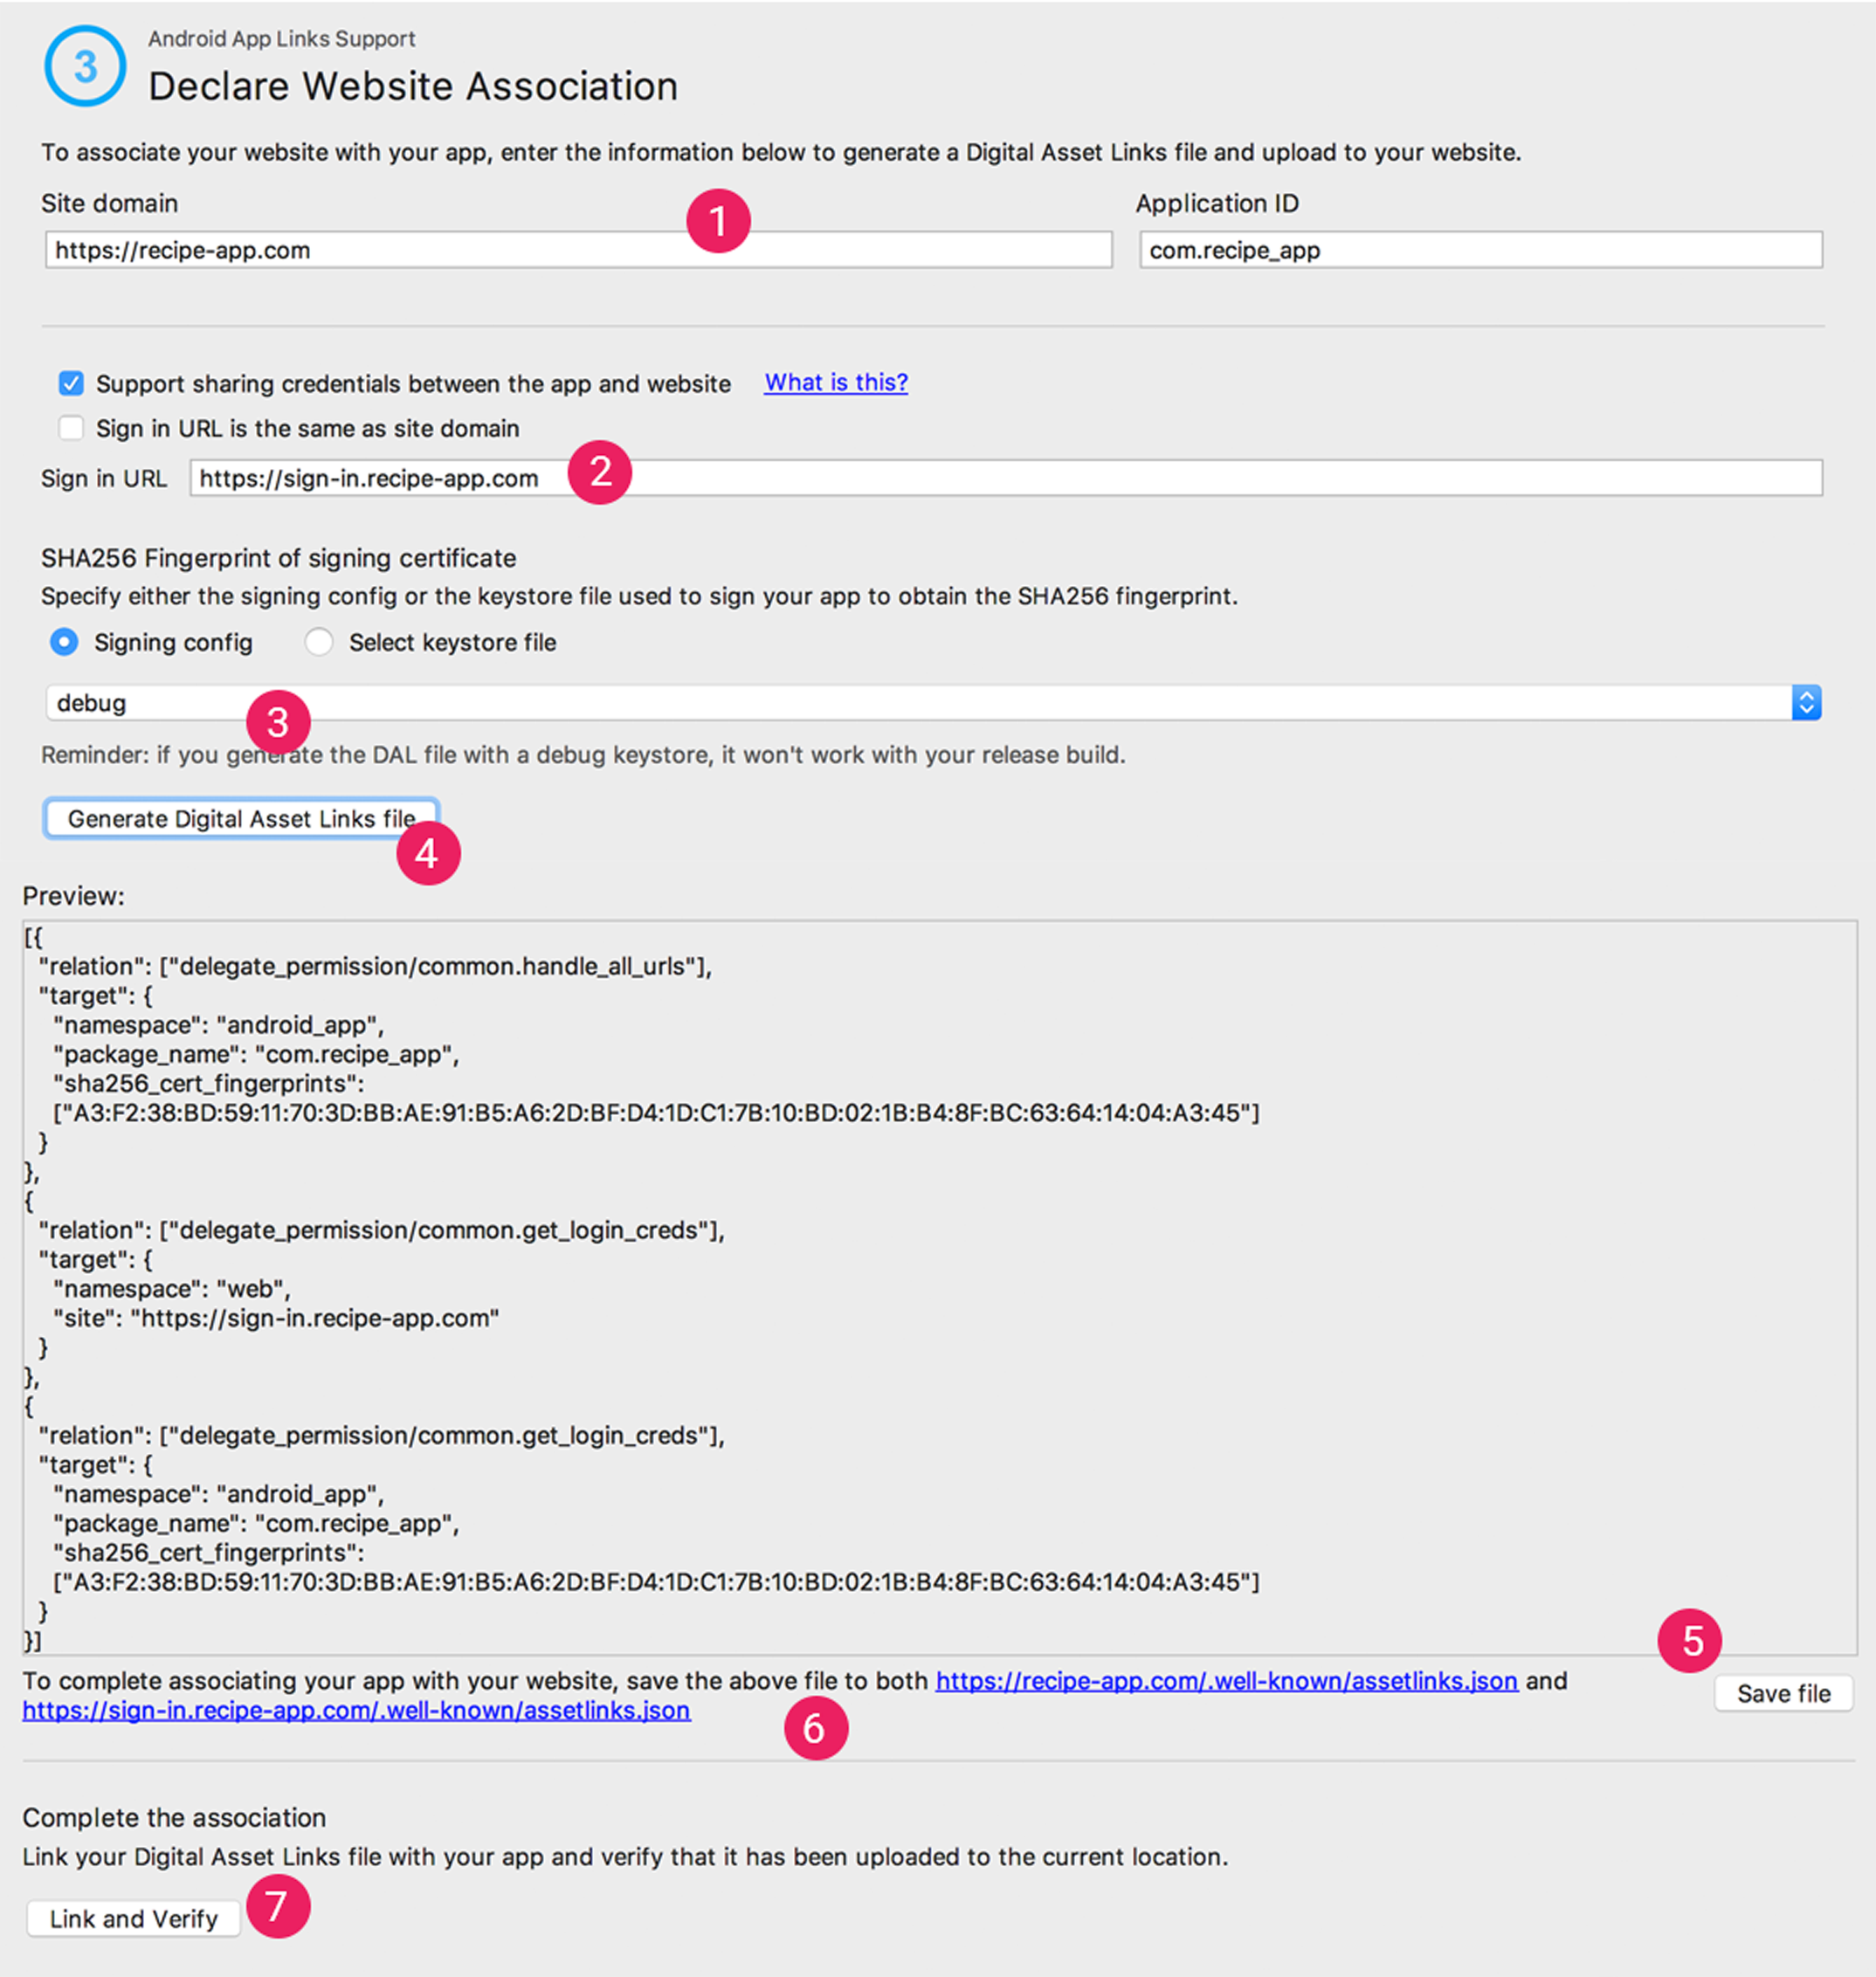
Figure 2. Enter details about your site and app to
generate a Digital Asset Links file.
- Enter your Site domain and your
Application
ID.To include support in your Digital Asset Links file for
One Tap sign-in, select Support sharing credentials between the app and
the website and enter your site’s sign-in URL.This adds the following string to your
Digital Asset Links file declaring that your app and website share sign-in credentials:
delegate_permission/common.get_login_creds.- Specify the signing config or select a keystore file .
Make sure you select the right release config or keystore file for the release build or the debug config or keystore file for the debug build of your app. If you want to set up your production build, use the release config. If you want to test your build, use the debug config .- Click Generate Digital Asset Links file.
- Once Android Studio generates the file, click Save file to download it.
- Upload the
assetlinks.jsonfile to your site, with read access for everyone, at
https://yoursite/.well-known/assetlinks.json.Important: The system verifies the Digital Asset Links file via the
encrypted HTTPS protocol. Make sure that theassetlinks.jsonfile is accessible over
an HTTPS connection, regardless of whether your app’s intent filter includes
https.- Click Link and Verify to confirm that you’ve uploaded the correct Digital Asset
Links file to the correct location.Learn more about associating your website with your app through the Digital Asset Links file in Declare website associations .
Test your Android App Links
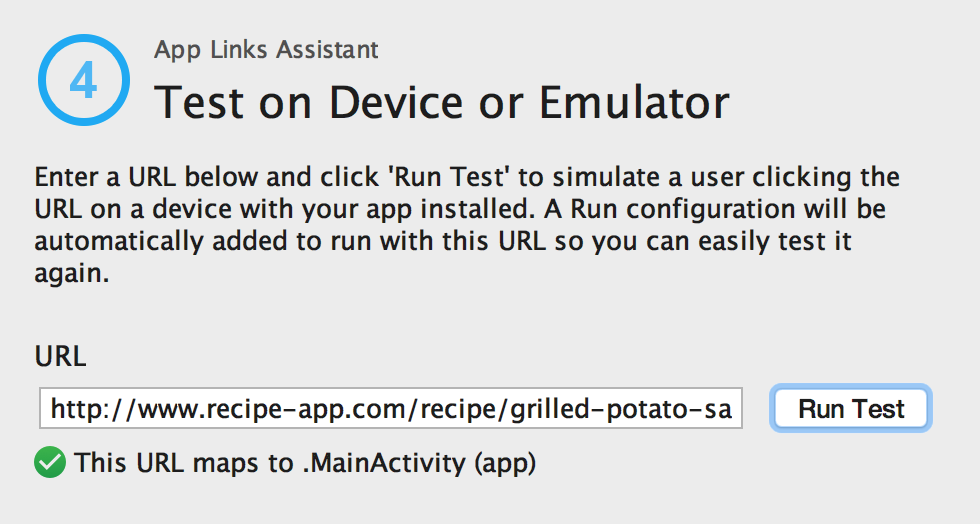
To verify that your link open the correct activity, follow these steps :
- In the App Links Assistant, click Test App Links.
- Enter the URL that you want to test in the URL field; for example,
http://recipe-app.com/recipe/grilled-potato-salad.
Figure 3. Test App Links dialog
showing a URL being tested and a success message.- Click Run Test.
If the URL mapping isn’t set up properly or doesn’t exist, an error message appears under the
URL in the Test App Links dialog. Otherwise, Android Studio
launches your app in the device or emulator at the specified activity without showing the
disambiguation dialog (“app chooser”) and shows a success message in the
App Link Testing dialog, as shown in figure 3.If Android Studio can’t launch
the app, an error message appears in Android Studio’s Run window.
To test Android App Links through the App Links Assistant, you must have a device connected or a virtual device available running Android 6.0 ( API level 23 ) or higher. For more information, read about how to connect a device or create an AVD .
Source: https://thomaygiat.com
Category : Ứng Dụng


Cách check mã lỗi điều hòa Carrier từng bước sửa chữa
Mục ChínhCách check mã lỗi điều hòa Carrier từng bước sửa chữa1. Tìm Hiểu Về Các Mã Lỗi Trên Điều Hòa Carrier2. Cách Tự Sửa…

Nguyên nhân tủ lạnh Hitachi báo lỗi F0-17 và cách khắc phục
Mục ChínhNguyên nhân tủ lạnh Hitachi báo lỗi F0-17 và cách khắc phục1. Lỗi F017 trên tủ lạnh Hitachi là gì?2. Nguyên nhân gây ra…

Cách sửa máy điều hòa Sumikura báo lỗi chuẩn an toàn
Mục ChínhCách sửa máy điều hòa Sumikura báo lỗi chuẩn an toànNhận Biết Các Sự Cố và Lỗi Trên Điều Hòa SumikuraHướng Dẫn Kiểm Tra…

Hiểu cách sửa mã lỗi F0-16 Trên Tủ lạnh Hitachi Side By Side
Hiểu cách sửa mã lỗi F0-16 Trên Tủ lạnh Hitachi Side By Side https://appongtho.vn/tu-lanh-noi-dia-nhat-hitachi-bao-loi-f0-16 Tủ lạnh Hitachi là một thương hiệu uy tín được nhiều…

Cùng sửa điều hòa Gree báo lỗi chuẩn an toàn với App Ong Thợ
Mục ChínhCùng sửa điều hòa Gree báo lỗi chuẩn an toàn với App Ong ThợCó nên tự sửa mã lỗi điều hòa Gree?A: Khi Nên…
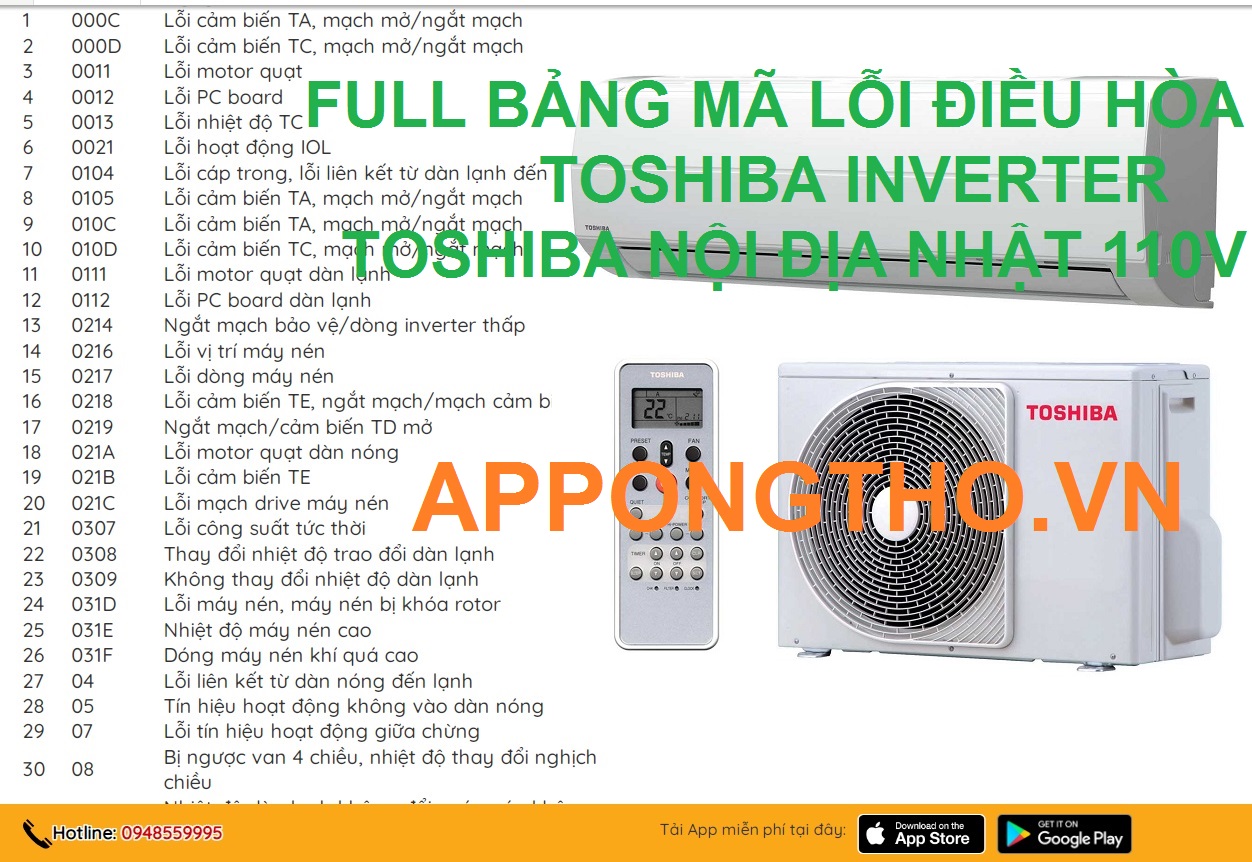
Tự sửa lỗi điều hòa Toshiba cùng ứng dụng Ong Thợ
Tự sửa lỗi điều hòa Toshiba cùng ứng dụng Ong Thợ https://appongtho.vn/ma-loi-dieu-hoa-toshiba Khi máy điều hòa Toshiba của bạn gặp sự cố, việc tự kiểm…